Wednesday, February 24, 2010

La baguette: finale

Last time I left you here:
I'm not sure what you chose to do with the collards, but today we will turn that dough into something wonderful. When you pull that big bowl out of the refrigerator, the dough should look something like this:
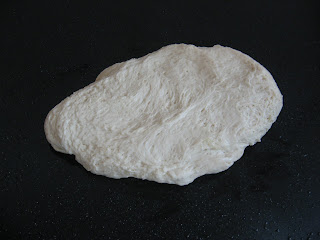
First things first, pull out about 1/4 of the dough and plop it on a well oiled counter (I used olive oil). Shape it into a rough oval, cover it with oiled plastic wrap and let it rest for about 15 minutes, just to come a bit closer to room temperature. During this time, the dough might begin to contemplate the fact that it now is an individual. This change in identity and the separation anxiety from the rest of the dough, now back in the refrigerator, might be a bit much so be sure to give it some quiet time alone to think this through and begin to appreciate the magnificent loaf that it will soon become.
 
Look at all of those holes! This is looking good! After your dough has rested for 15 minutes, we need to form the loaf. Begin by turning the dough so that is is longer right to left:
Next, fold the far side over to meet the near side and seal the seam with the side of your hand.
 
Repeat this step, and you should end up with a slightly elongated tube of dough.
Cup your hands over it and gently roll it back and forth until it reaches 12 or so inches.
Place it on your baking sheet lined with a silicone mat or parchment paper, cover with the oiled plastic wrap again, and let rise for 1.5 hours.  Again, a warm, moist environment will make it all that it can be. About 1 hour in, begin preheating your oven to 450F. It must be fully preheated before putting the loaf in.
 
After rising is done, make 3 or 4 slashes diagonally along the loaf. Use a sharp knife and slice with intent. If you shy away from it, the slices will not get through this tender dough.


Spritz the entire loaf with water. At this point, fill up the broiler pan, or a jelly-roll pan with water and slide it in your oven on the bottom rack. Put the bread in the oven on the middle rack. The steam from the water will ensure a crunchy, crackly crust.

Finally, bake for 20-30 minutes, watching carefully from 15 minutes on. When the bread develops a deep golden brown crust, it's ready! Let it rest on a rack until it is safe to handle. Mmmmmm, you just made bread. Can this baguette rival those in great french bakeries? No. Can it top a Wegman's baguette? No. Is it a great substitute when you live far, far away from either of those? Absolutely. The quality of this loaf is leaps and bounds above what is available in my rinky-dink local grocer. And you get the added benefit that your entire home will smell like freshly baked bread. Go ahead, impress yourself with your bread-baking prowess. If a baking illiterate like myself can do it, so can you!

Tuesday, February 23, 2010

La baguette: premier acte

I have a bit of a bread habit. In an average week, we go through 3-5 baguettes in our house. I am also picky about said baguettes: the must have a crackly brown crust and a sourish, holey interior that looks nothing like Wonder bread. As I hail from the land of Wegmans, I grew up with easy access to 24/7, whenever-the-hell-I-felt-like-it delicious bread. Moving away from this king-of-all-grocers was a bit of a shock to my system. Even worse, although I love to cook, I have never been much of a baker. I measure more in handfuls than cups, and gauge temperature by touch and eye not numbers on a dial. Baking my own bread was surely out of the question, or so I thought.

A friend suggested King Arthur Flour's "Almost no-knead baguette" recipe a while ago. I love it. Make a batch of dough on a Friday night and it will last through the following week. The crumb is perfect and it delivers a crisp, crackly crust. Here's how I did it:

Ingredients
3 cups lukewarm water
7-8 cups King Arthur All Purpose flour (I did try it once with bread flour and did not like the results)
1.5 TBSP Kosher salt
1 TBSP Instant yeast

Method
1. Add water and yeast to a large bowl and mix well. As long as you use instant yeast, you do not have to let it sit, or add sugar to get it working. I have been using SAF Instant and it works great every time.

2. Stir in the flour and salt. Start with 7 cups of flour and add more as needed. I usually end up adding around 7.5 cups total. The dough should be sticky and wet when you are done with no dry spots left. If you add too much flour, you will not end up with the lovely, holey interior. As you can see, I am doing this by hand. You do not need a fancy-pants stand mixer with a bread hook to make this bread (but I would certainly use one if I had it!).

 
3. Throw the dough out on your lightly floured counter (or keep it in your stand mixer) and knead gently for a few minutes by pulling the far side of the dough up and over, then pushing away from you with the heel of your hand. Lovely picture, eh? I was kneading with such fury! Once this is done, form into a ball and place in a well oiled bowl. Cover with a kitchen towel and let sit in a warm, moist place for about 2 hours. For me, this happens to be the microwave, above my range, while a pot of soup is bubbling away. This is the best way it works for me... quirks of my kitchen!
 
By now the dough should be doubled in size, and it will be too dark to take any more pictures. Cover the bowl with plastic wrap and stick it in the fridge. It gets along well with dark, leafy greens.Kick up your feet and have a glass of wine (do not underestimate the importance of this step!). 
 
Tomorrow: how to turn this into something special.

Friday, February 19, 2010

Brighter days

Thursdays usually suck. I am on campus for 10+ hours beginning with office hours and ending with back to back classes. I love meeting students and I enjoy the classes I am teaching (I lucked out with such a great group of students this semester), but teaching for four hours at the very end of a long day just wipes me out. On top of that, I am starving by the time I finish, but it is nearly 9:30pm. I do not want to cook after finishing this day and the only places open here at that time are burger joints or pizza places. Not exactly the type of food that one needs to recover after a taxing day.

Yesterday was perhaps the most beautiful Thursday I have had this semester though. The sun saw fit to break through the clouds in full force, and although the thermometer said it was only 35F, it felt like a spring day. I got to have lunch with my man where we lingered over our meal discussing the day and had a long, wandering walk back to campus sucking up every last ray of sunshine we could. I had to run out to the store midway to pick up supplies for my lab and happened to bump into a good friend at the store. Finally, I had a great class with lots of student participation. We even had a dialogue about dental development (my dissertation topic)!

This great day made me so thankful for all that I have. It also has me eagerly awaiting the return of the farmer's markets. That hint of spring during the day had my mind spinning with longing for the beautiful veggies of spring and summer. Soon enough!

Sunday, February 14, 2010

All Thai-ed up

Upon learning that I would soon be moving to the Midwest, I was a bit concerned about the food situation. I am from the east coast originally, and have always had easy access to delicious and authentic ethnic food. I really dig ethnic food. Spicy, exotic, scintillating. Moving south I encountered Mexican and BBQ that made my shoulders scrunch up and had me grinning from ear to ear. I still miss that great BBQ place that set up shop in an old Taco Bell.

While acknowledging the fact that I did not have the faintest idea about Midwestern food culture, I was still a bit wary to head to the land of beef and corn. If only I had known about the vast refugee resettlement that has been going on here for some time. The dynamic Vietnamese and Sudanese populations here have endowed my city with numerous restaurants and markets. Heck, we've even got an Iraqi restaurant -- take that Buffalo!

In a couple of areas, the selection does suffer. I miss Indian. I miss Chinese (the real stuff like at Ming Cafe in Buffalo). I miss Thai. But don't worry about me, I won't take this lying down. I will rise to the challenge. I will learn to cook these cuisines for myself! This quest for knowledge began around the time of a rather serendipitous visit of my friend's mother, a native Thai. She was gracious enough to give me a hands-on demo in my own home. In one night, we worked through a few dishes.

First, we prepared Tom yum, a refreshing chicken soup made with lemongrass and Kaffir lime leaves. This soup, or its sister Tom ka, are always the first course for me at a Thai restaurant. I was concerned that recreating the depth of flavor would be impossible in my kitchen (they have magical beings in the back of all Thai restaurants, you know).  I am happy to report that it WAS possible! I highly recommend this soup when you are a bit stuffed up, or feeling sick; the aromatics will get you back on your feet in no time. It is just dandy on a Tuesday night too. Or a Wednesday. Maybe Friday would work.

First, take most of the meat off of two bone-in chicken breasts. Don't be too concerned with getting them entirely clean, the extra stuff will add flavor. Put the bones in a medium saucepan with 4-5 Kaffir lime leaves, 1 stalk of lemongrass chopped into 1- 2 inch pieces, and if you can find it, 1 or 2 coin sized slices of galangal (click on the link for an explanation). Cover with water and boil for about 20 minutes. Cut up the breast meat into thin strips/slices and add to the pot, cook through.

In the interest of full disclosure, Mom told me that "ka" means galangal. The main difference between Tom yum and Tom ka is the addition of coconut milk and galangal (ka) to the latter. She likes it though, and threw it in to our Tom yum anyway.
Chop: 1/2 medium onion, 2 large scallions (greens and all), and a small handful of cilantro. Add to broth with 4-5 Tbsp of fish sauce. (I was told that the Tiparos brand is the one to use.) Squeeze in the juice of a lemon, tasting until the right salty/sour balance is reached (this is according to your taste of course!).

And then...... remove the bones and eat! Tom yum indeed. Enjoy!